I've gone and bought this crappy CX500, with the intention of making something that looks a bit better! Hopefully the maggot won't turn into a fly!

Not only is this my first attempt at a blog! but it's also my first attempt at creating a"custom" motorcycle!! I don't really know what I'm doing in either case, so we'll see how it goes.

You'll have to look at the photo below to see why I chose the 'maggot'!.........see something good can be found in everything!!

Wrenchmonkees CX

Sunday, 1 April 2012

Update 3

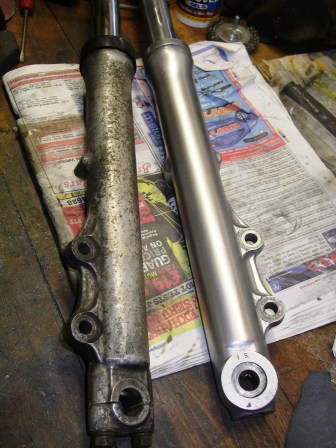
Well, I let things slip again blogwise, & didn't get round to the third update! Breifly then, I have started to build up the front end as I finish cleaning & refurbishing parts, think it starting to come together:


The stantions actually look a lot better than I thought they were going to, so I'll probably dispense with the old shrouds & leave them 'nekkid!!'

Tuesday, 20 March 2012

Update 2

I wanted to clean up the switch gear as I'm reusing what I've got. Of the two sets I have one has an on/off switch for the lights & one didn't, of course the set I wanted to use (with the on/off switch) was the crappier of the two!! This bike is nothing if not a challenge!!


To remove the anodising which had faded badly I ended up resorting to some oven cleaner:


After about 45mins the anodised finish was all but gone, just needed to be scotchbrighted to get rid of the oxidised finish. Haven't got a photo so will need to get one of the finished item & upload it later!!

Monday, 19 March 2012

Update 1

Been a bit of a lazy git and not updated the blog for a while, but it doesn't mean that I've not been chipping away at things! While theres not heaps & heaps to report I'll break it into a couple of chuncks, for ease.

While I'm waiting for the engine seals I thought I'd press on with the front end. The brake calipers were as you might guess pretty crappy looking:


but a couple of hours with the paint stripper & wire wheel got it looking much better:


Even managed to get the bleed nipples out without snapping them off! Plenty of penetrating oil, gently heated the caliper body, & several sharp taps from Mr Hammer saw them out!

What is it with Japanese spares!!


Tuesday, 21 February 2012

Some engine progress

Finally managed to get back to the shed & do a few more bits & bobs!

Replacement cam & oil pump chains arrived....


It says on the box not to install by yourself!! Bloody hell there 'aint no one else going to do it!! anyway it was suprisingly straight forward to do. Both were fitted within a couple of hours. Now waiting for a set of oil seals then I can finished re-assembling the motor.

Have decided to paint the engine cases now, the wired finish is just too patchy looking. I bought a tin of Hi-temp 'metallic black' engine paint which should look quite nice, more understated than the original bright silver, & a change from all black.

Sunday, 29 January 2012

More clean & shiney

I bought a cheap random orbital sander yesterday, less than 30 quid complete with various grade sanding discs, a set of scotchbrite type discs & a set of polishing discs !

I was getting a bit bored with rubbing down & trying to get a good finsh to the alloy parts by hand, so had a go with the new toy...


came out sweet!! I have decided to leave the matt scotchbrited finish rather than bling polish. Wont be quite so demanding to keep clean either!

Monday, 16 January 2012

Shiny bits!

Spent some time cleaning & smoothing  the top & bottom yokes:

I polished the top by hand, wish I had some polishing mops! but it has come out quite well considering!!


The pitted cast finish to the bottom yoke was smoothed off, ready for either paint or powdercoat:


 Also have received the new tapered roller bearing headset.

I decided to have had a go at using electrolysis to remove rust using a solution of sodium bicarbonate, & a battery charger. I understand washing soda is a bit better, but I don't have any washing soda & have a big bag of bicarb!

The first part to be treated is the front mudguard, as you can see the underside is quite heavily corroded!!


 It was left fizzing away overnight, & it ended up like this:


Not too bad, quite pleased!

Monday, 2 January 2012

Christmas progress

Well having the Christmas week off meant that not only did I have to suffer the ususal trials of the festive period, but I was able to get some time on the project!

The engine is now cleaned & waiting for the new cam & oil pump chains & a set of seals, so while I wait for them to arrive I thought I'd start sorting out some of the bits & bobs on the forks.

I made brackets for both the Bates type headlight & the mini speedo that I'm using & sorted the mounting positions etc. 

I decided to utilise the old top fork shrouds that also originally supported the headlight, the headlight brackets were cut off as they are surplus to requirements, part of the base was trimmed off & the remaining shrouds cleaned up, they don't look too bad in the rough finish state.


I also have done the first rough pass in cleaning up the top yoke, chopping off the original handlebar mounts & cleaning off the casting line that ran around it.

Before:

After:

At the moment I'm not final finishing things until I complete the dry assembly of everything. I don't want to put a whole load of work into something that may get trashed! So don't think that crap look is what I'm going to end up with!